How to Install Xubuntu on a Toughbook CF-18
Posted by Ed Lasher on 25th Jul 2016
Before you can get the front buttons working on your Toughbook CF-18 or CF-19 running Linux, you will need to download panasonic-hbtn.zip (credit to Heiher for developing the code on which this was based).
Click here to download panasonic-hbtn.zip
Step-by-step: How to install and configure Xubuntu for a Panasonic Toughbook CF-18
I used a Toughbook CF-18 MK4 to do this installation. I also tried a CF-18 MK2, but the BIOS did not support booting from a USB drive. Please also note that older hard drives found in these computers may be reaching the end of their lives. I can't make any guarantees that this will go smoothly for you.
Step 1. Making a bootable USB drive
(These instructions are for making a bootable USB drive on Windows 7. If this doesn't work for you, you might need to Google this part and meet up with us again at step 2.)
The CF-18 does not have a media drive, so we can't simply burn a Xubuntu DVD. Instead, we'll have to use a thumb drive. Find a USB drive with at least 2GB of storage space. Make sure it is either blank or backup its contents, because we will be reformatting it.
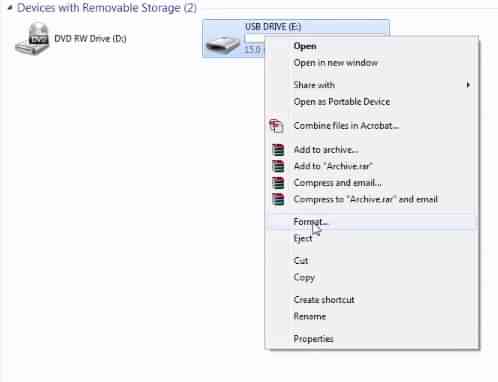
Insert the USB drive, then right click the drive icon and select "Format..."
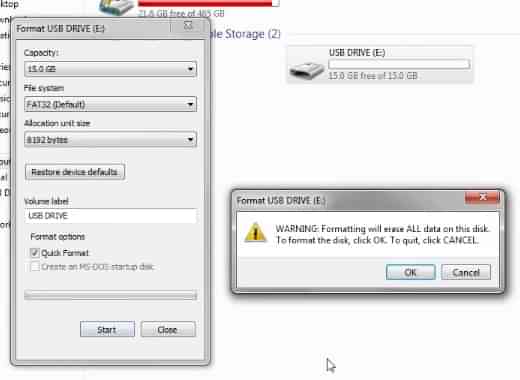
Make sure the file system is set to FAT32, then click start. Click OK when it the warning pops up. All data on the drive will be cleared.
Download the latest LTS (Long Term Support) version of Xubuntu from Xubuntu.org using either a torrent client or one of the mirror sites. Make sure to download the 32-bit version, as the CF-18 does not support 64-bit. If you download from a mirror site, the file you want to look for will end in -i386.iso. Ignore the other files.
For the next part, you'll need a USB installer. I used Universal USB Installer (UUI). Open up the installer and select your distribution from the list, then browse your computer for the iso file and follow the onscreen instructions. Eject the USB drive when it finishes. It might take a few minutes.
Step 2. Installation
Insert the bootable USB drive into your powered-down CF-18. Hit the power switch and get ready to hit F2 as soon as the Panasonic logo comes on screen.
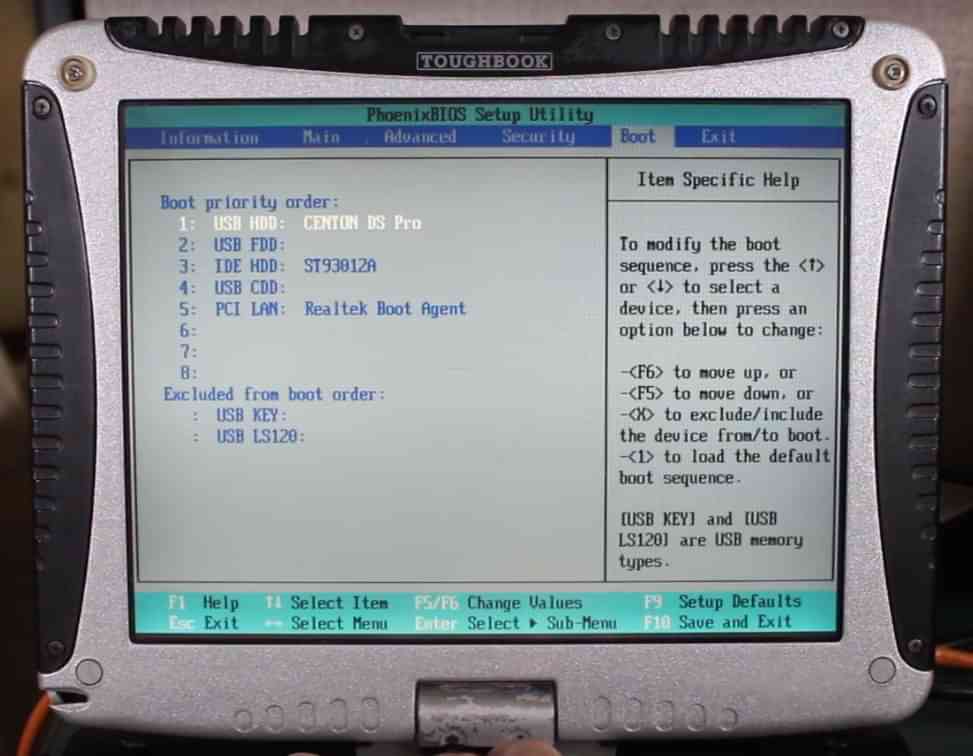
When you hit F2, your system will open up the BIOS. Using your arrow keys, navigate to the Boot tab. Find your USB drive in the list. If it is excluded from the boot order, hit X to include it. Move it up to the top position using the F6 key, then hit F10 to save and exit.
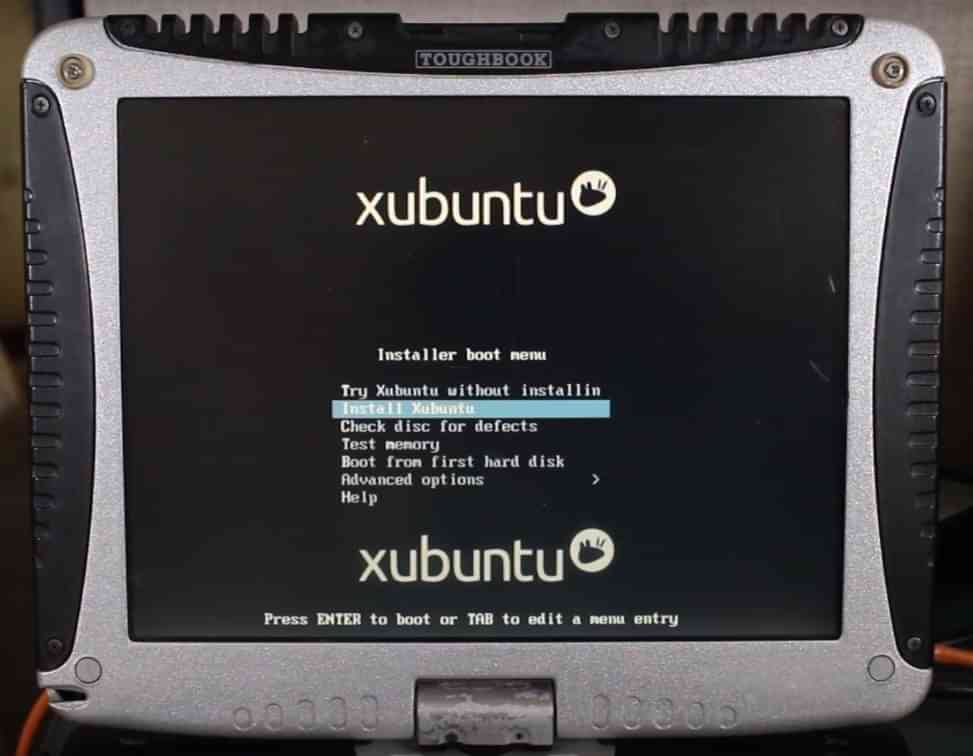
The computer should now start up to the Xubuntu installer boot menu. If you like, you can try Xubuntu without installing, but for the purpose of this tutorial, we're going to select "Install Xubuntu."
At this point, Xubuntu will guide you through the installation process. It's a good idea to have an Internet connection when you do this so that you can have it download any updates and recommended software.
When it's finished installing, it will prompt you to restart your computer. After you click the Restart Now button, be ready to hit F2 again when the Panasonic logo comes up to get into the BIOS. Tab over to the boot menu and either hit X to exclude the USB drive or hit F5 a few times to bring it down to the bottom of the list. This will prevent your computer from trying to install Xubuntu a second time.
Hit F10 to save and exit. Your CF-18 should now load Xubuntu.
Issues that need to be fixed
Wouldn't it be great if everything just worked out of the box? Well, Toughbooks are finicky and let's be honest, so is Linux. We have a couple things to fix:
- The touch screen is all outta whack
- Some of the front buttons don't work (on-screen keyboard, enter, rotate screen and lock)
- Mouse cursor disappears when waking from suspend
Even after this tutorial, you might not be able to get all the buttons working (the on-screen keyboard button wouldn't work for me), but let's fix what we can.
Step 3. Calibrating the touch screen
Make sure you are connected to the Internet, then open up your terminal (Ctrl+Alt+T). Enter the following to make the directory where we will store our configuration file:
sudo mkdir /etc/X11/xorg.conf.d
Install the calibrator:
sudo apt-get install xinput-calibrator
Next we'll run the calibrator. For optimal precision, make sure you have a stylus on hand:
sudo xinput_calibrator
A screen will come up with dots. Poke each one.
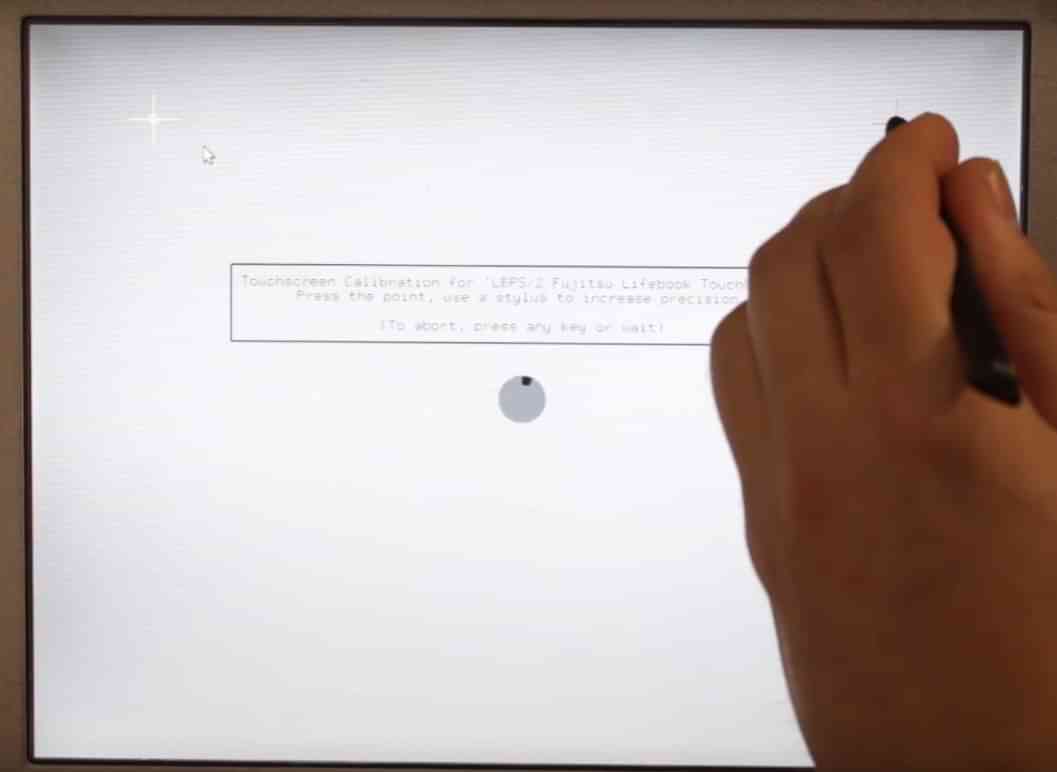
After that's finished, the calibration utility will close and a block of text will appear in your terminal. Copy everything from Section through EndSection.
Next, we'll open up a text file where we'll keep that data:
sudo nano /etc/X11/xorg.conf.d/99-calibration.conf
The terminal will display a blank file. Paste the contents of your clipboard. Hit Ctrl+X to exit, Y to save, then the enter key. Your touchscreen is now calibrated and should work properly from here on out. If you ever need to re-calibrate, simply run the calibration utility again and update the data in 99-calibration.conf.
Step 4. Getting the front buttons to work
To get Xubuntu to recognize the front buttons, you will first need to download the custom utility mentioned at the top of this article. Here's the link again: panasonic-hbtn.zip
When the zip file finishes downloading, extract it to wherever you want. I put it in my home directory.
Open up the newly created panasonic-hbtn subdirectory in the terminal (either navigate to it using
cd whereveryousavedit/panasonic-hbtn/ or right click the folder icon and select Open Terminal Here). From within the panasonic-hbtn folder, enter the following command:
sudo ./install.sh
At this point you have made the OS recognize the front keys (they still won't do anything until they are assigned to functions) and you have installed a script for rotating the screen. To make sure that the rotate script works, enter
rotate into the terminal. Each time you enter that command, the desktop should rotate a quarter turn.
Next, we'll assign the rotate function to the proper front button. From the Xubuntu "start" menu, click the Settings shortcut, then select Keyboard.
In the keyboard settings window, select the Application Shortcuts tab. From there, click the Add button. Another window will come up prompting you to enter the command you want to trigger with a shortcut. The command you want is located at /usr/local/bin/rotate. Once you've selected the command, click OK. Another window will pop up telling you to enter the keyboard shortcut you want to trigger the command. Press the rotate screen button. Voila.
You can assign the lock button with whatever you want, but if you want it to function as originally intended (or close to it, at least), you can use the xflock4 command. Now when you press it, your CF-18 will go to sleep and awaken to the lock screen.
Step 5. Fixing the disappearing mouse cursor
Unfortunately, this one is really more of a workaround than a true fix.
When you wake up your computer, you might find that the mouse cursor has gone invisible. This is a bug that spans multiple Ubuntu flavors and affects all kinds of computers. Hopefully the developers will fix this at some point, but in the meantime we can bring the cursor back by opening and closing a virtual console. Use the keyboard shortcut Ctrl+Alt+F6 to open it, then Ctrl+Alt+F7 to close it. Your cursor is back and order has been restored. At least until the next time you wake up your computer.
Any suggestions?
If there's a Linux-Toughbook combination you'd like to see, let me know in the comments section and I will do my best to make it happen!
