How to Use the GPS in Your Toughbook for Turn-by-Turn Navigation
Posted by Ed Lasher on 14th Aug 2019

Don't feel like reading? Watch the YouTube video here
Using Your Toughbook's GPS
Requirements: to follow this tutorial, you need to be using Windows 10 (This will not work with Windows 11 currently, as there is a bug where, in Microsoft Maps, your GPS will disconnect after several minutes). Your Toughbook will also need to have GPS hardware installed.
GPS in Toughbooks is most commonly used for things like land surveying, fleet tracking, marine charting and various scientific applications. It is not typically used for navigation. In the past, we’ve always told people that the Toughbook GPS hardware doesn’t work well for turn-by-turn road navigation. As it turns out, we were wrong. We’ll detail how to use your Toughbook's GPS in a moment, but first we will give you a bit of background information.
Historically, road navigation software has been extremely hard to find for laptops, and the options available were never very intuitive. Now that we’re all using Windows 10, however, we have a pretty solid maps app included standard with the operating system. Slam that start button and look for Windows Maps. If for whatever reason it isn’t there, you can download it free from the Microsoft Store.
If you’ve tried using Windows Maps before, you may have found it to be acceptably precise but very slow to update your location, if it worked at all to begin with. That had been our experience, too. We had tested the GPS hardware and confirmed that it was working, but turn-by-turn navigation with Windows Maps was impossible. If we had dug a little deeper, we might have found that the issue was not in fact a limitation of the hardware, but rather Windows’ default method for gathering location data.
When you see your location in Windows Maps, it’s not actually using your GPS to figure out where you are. Instead, it figures out your location using Wi-Fi triangulation and your IP address. That solution is less than ideal if you are connected to the internet, and totally useless if you’re not. There is no indication anywhere in the software that it isn’t using your GPS hardware. Even if you’ve figured out the problem, there is no setting to change it. But we can fix it using a special driver that helps your GPS hardware talk to your software.
If you skipped the long-winded explanation, this is where the instructions start
To get your GPS hardware talking to the location sensor in Windows 10, we’re going to use a piece of middleware called GPSDirect. You can get GPSDirect with an evaluation license for free, while the full version comes in at a very reasonable EUR 9.99 (about eleven bucks in US dollars). Everything we’re going to do works on the evaluation license, so we recommend that you make sure you have everything up and running properly before buying the full version.
Step 1: Download GPSComplete
GPSComplete comes with a few different drivers/tools, but we’ll only need to worry about GPSDirect. Download it here.
Step 2: Install and configure GPSDirect
- Double click the .exe file you just downloaded. Windows will ask you if you want to allow the app to make changes to your device. Click Yes.
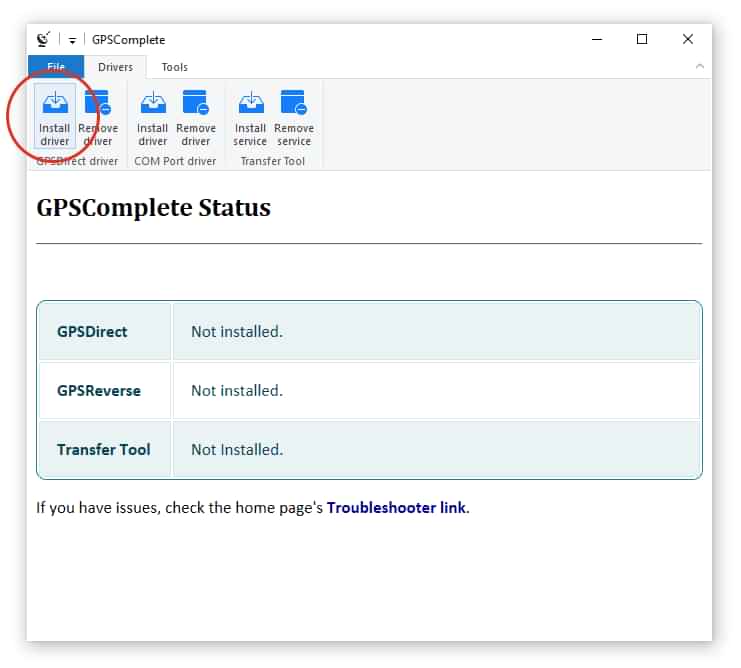
- GPSComplete will open. Click Install driver under the GPSDirect driver section in the ribbon menu.
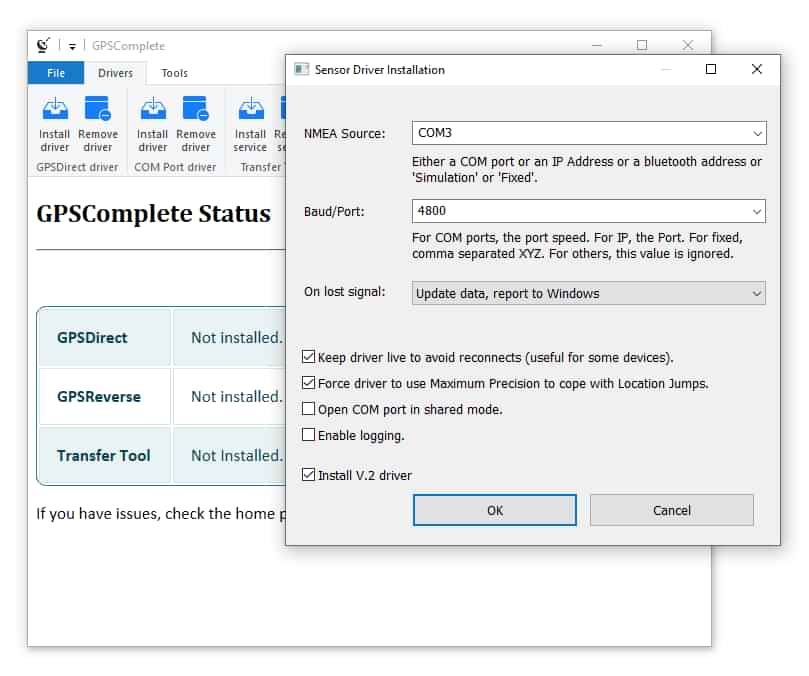
- A Sensor Driver Installation window will open where you can input values for NMEA Source and Baud/Port. The values we’re inputting are for the CF-19 MK6 we used for testing, but they should be the same for most Toughbooks equipped with GPS hardware (exceptions include the CF-53 MK4, which uses COM2, and the CF-31 MK5, which has a port speed of 9600).
- Set NMEA Source to COM3.
- Set Baud/Port to 4800 (your GPS device properties might say the port speed is 9600. Set it to 4800 anyway).
-
Leave all the other settings as-is and click OK.
- Windows Security will ask you if you’d like to install the device software. Click Install.
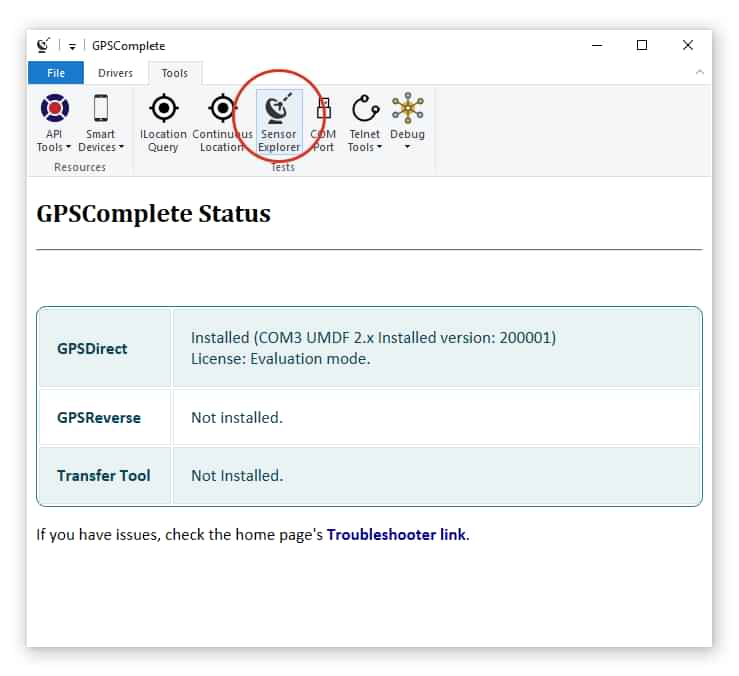
- Once it’s successfully installed, a dialog box will pop up suggesting that you test the sensor using the Sensor Explorer tool.
-
Click the Tools tab at the top of the window and select Sensor Explorer from the Test section in the ribbon menu.
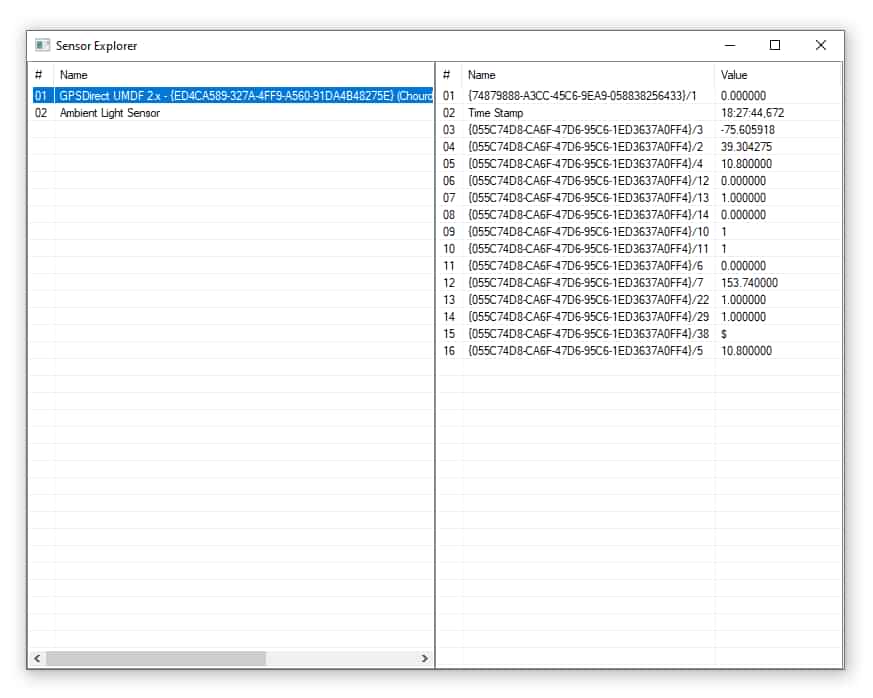
- The Sensor Explorer window should show two columns. Click the GPSDirect row in the left column.
-
You should see a timestamp continuously climbing and several rows of numbers.
-
If the numbers are just a bunch of zeroes, that means the GPS receiver is not picking up the signal from the GPS satellites. It may take a few seconds to work, so give it a little time. If that doesn’t work, try taking the laptop outside. If it still isn’t picking up a signal, and you know you’ve followed the instructions correctly, you might want to check the Toubleshooting page on the GPSComplete website or look for a solution on the GPSComplete forum.
Note: after setting up the GPS, it will run constantly. If you want to turn it off, you will have to open up the GPSComplete exe file and uninstall the driver by clicking the Remove driver button under the Drivers tab in the GPSDirect driver section of the ribbon menu.
Step 3: Download offline maps
Since you presumably will not have an internet connection while using turn-by-turn navigation, you’ll need to download any necessary maps ahead of time.
- Open the start menu and click the gear icon to open Windows Settings. In the search box, type “Offline maps” and select the corresponding item.
- In the Offline maps settings, make sure the download location is set to This PC (C:), then click Download maps.
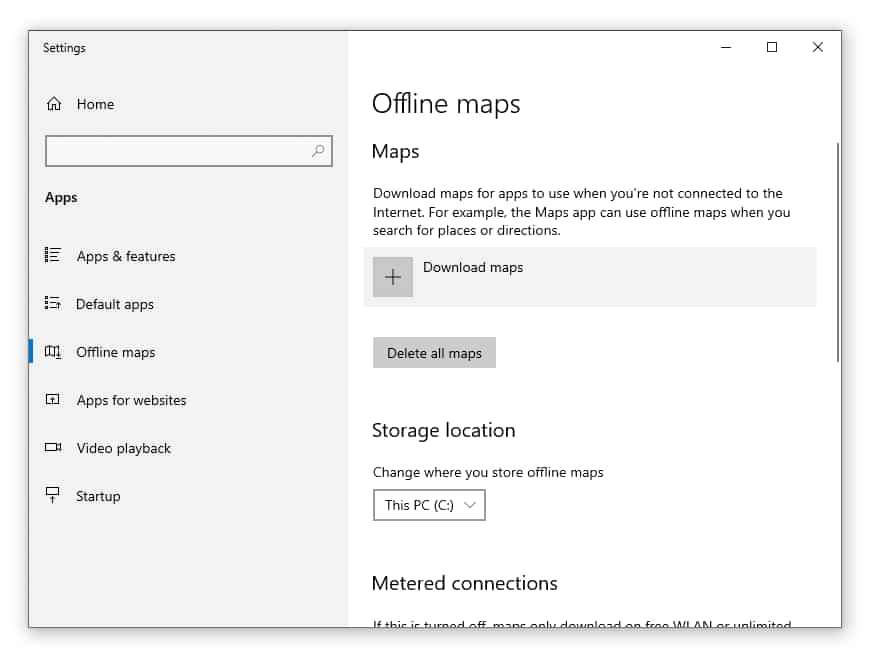
- You’ll be presented with a list of continents. When you select your continent, it will drill down to countries then, if applicable, regions or states. Click the location for which you want to download a map. Once you’ve downloaded your preferred map, you will be able to navigate that area without an internet connection.
Step 4: Hit the road
- Open up Windows Maps. It comes packaged with Windows 10, but if you don’t have it, you can download it from the Microsoft Store.
- Enter the address where you’d like to go into the search bar and click Directions when it comes up. Put your car in drive and go!
Note: We had an issue with addresses not showing up when we searched for them. Deleting the map via the offline map settings and re-downloading fixed the issue.
