Help! My Toughbook Won’t Connect to Wi-Fi!
11th Jan 2021
How to get back online using Panasonic’s Wireless Switch Utility
At some point, your Toughbook’s Wi-Fi was turned off. Maybe you switched it off yourself, or maybe Windows ran an update and shut it off. It might be a mystery. What matters is that you need to get online and you can’t. Now you are ready to throw your Toughbook through the wall. Don’t do that. Walls are expensive. This issue is easy to fix.
(Just as an aside, any computer purchased from Bob Johnson’s Computer Stuff will arrive at your door properly configured, so unless you wipe the storage drive and load a fresh operating system yourself, you shouldn’t run into weird little problems like this. Want to avoid the headaches next time? Take a look at our selection of new and refurbished rugged laptops and rugged tablets. Now, back to our regularly scheduled programming.)
Diagnosis
Before we put on our Cyberpunk outfits and start hacking into the Matrix, let’s make sure we aren’t missing anything basic. Click the Network & Internet icon on your Windows 10 taskbar (it will be somewhere to the left of the clock and looks like a little globe when Wi-Fi is disconnected, or a little computer monitor with an ethernet cable next to it when you are on a wired connection). Click the icon to open the Network menu and try clicking the Wi-Fi button to connect.
Some Toughbook models have a physical switch for toggling the Wi-Fi connection. Make sure it is set to the on position. Here’s where the switch is located on a few common Toughbook models:
CF-31 - Left side, behind the media port door, to the left of the SD card slot.
CF-19 - Behind the door on the front left side, below the PC card ports, to the right of the SD card slot.
CF-53 - Right side, middle door, below the PC card ports, to the right of the SD card slot.
CF-54 - Right side, middle door, left of the headset jack.
Even if one of those solutions worked for you, we recommend continuing with this tutorial, if only to make sure your Toughbook has the proper software so you can avoid Wi-Fi connectivity problems in the future.
Check for Wireless Switch Utility
All Panasonic Toughbook models require an application called Wireless Switch Utility to toggle Wi-Fi. You might be fine without it for a while, but eventually, for one reason or another, the Wi-Fi receiver in your Toughbook will get switched off. Without Wireless Switch Utility, it likely will not go back on.
To see if your Toughbook has the utility, click the arrow on the right side of your Windows taskbar to show hidden icons. Do you see a little lightning bolt symbol?
![]()
If you don’t have the lightning bolt symbol, you don’t have Wireless Switch Utility. The utility is a download, so to start out you may have to use an ethernet cable for a wired internet connection.
Download Wireless Switch Utility
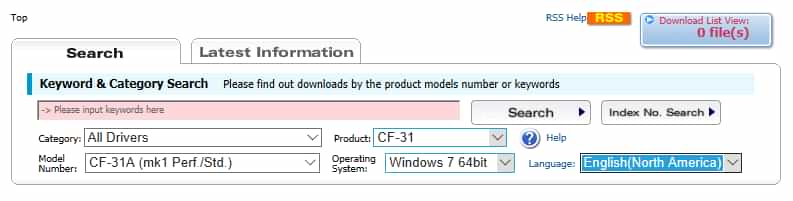
We prefer to download our drivers from the Japanese Panasonic website (don’t worry, it’s all in English), but if you prefer the inferior experience of the North American website, feel free to roll the dice on whether or not it will have what you are looking for. You can find the better Panasonic Download Center at pc-dl.panasonic.co.jp/dl.
Enter the information for your Toughbook and click search. (Note that, depending on your Toughbook model, Windows 10 may not be an available option. Not to worry, most Windows 7 drivers and utilities will work on Windows 10, including this one.)
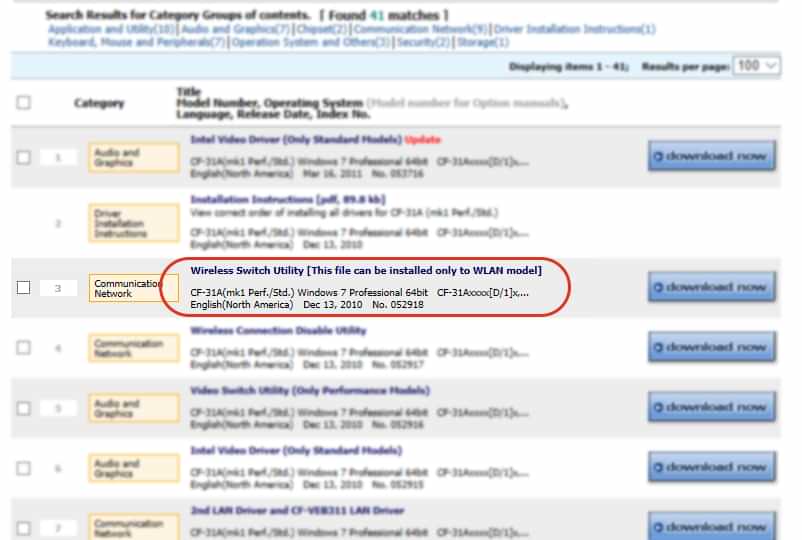
Locate Wireless Switch Utility on the list and click it.
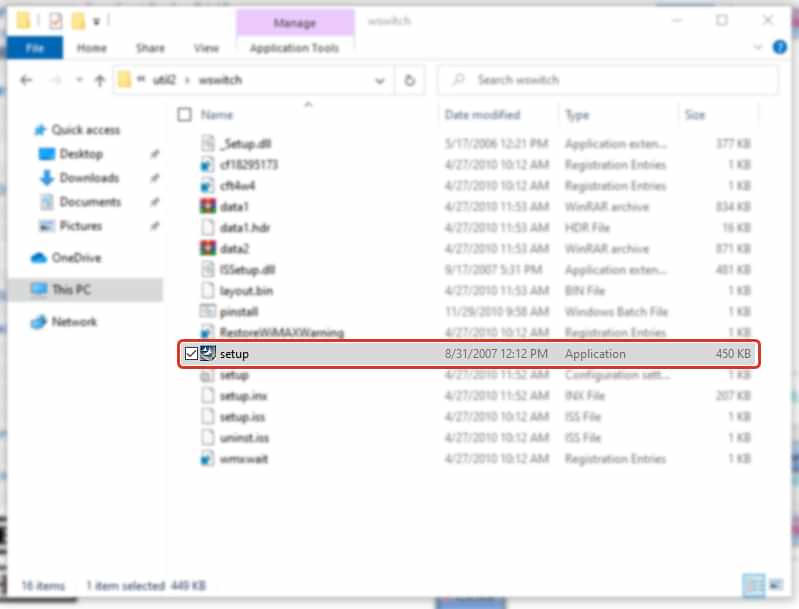
Download and run the executable file. By default, the destination folder will be c:\util2\wswitch. Leave that as is.
After a moment or two, you’ll get a notification that it has finished unpacking the files. In File Explorer, navigate to the C:\util2\wswitch folder and double click the setup application file.
An InstallShield Wizard will open up. All you need to do from there is click the Next button and then the Install button. Once it installs, click Finish to restart your computer. You should now be able to connect to your Wi-Fi network.
Still not working? Leave a comment below and we’ll do our best to help.